
In the land of the half-lion, half-fish mutant, there's the half-cake, half-kueh: pandan kaya quake.
kueh + cake = kuake = quake
Dig?
Using kueh as an icing makes perfect sense when you live in the tropics. There's no need to worry about the icing melting even when there's a heat wave. El Niño? Bring it on! No aircon? No problem!
The cake part of pandan kaya cake is quite straightforward. It's a sponge cake made with the separated

egg method. If you follow the recipe and you know how
to whisk egg whites to firm peak stage, your cake will be fluffy, moist and fragrant.
If you don't know what the hell firm peak stage is and you need instructions on how to follow instructions, please refer to my posts,
Cake FAQ and
Cake Dos and Don'ts.
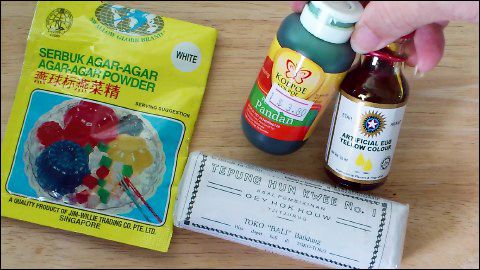
The kaya part of pandan kaya cake is made with pandan juice, as well as pandan paste to boost the colour. There's coconut milk as well, pandan's best friend. These two are real buddies, you know? (Of course you do.)

The two combined would make (almost) anything sweet taste good.
Turning pandan leaves into pulp is easy when you use a food processor or blender instead of mortar and pestle. (You knew that, of course.)

How to squeeze the hell outta pulverized pandan leaves, so that you get every drop of juice possible?

The hard way: with your bare hands. The easy way: with a potato ricer. (You know Archimedes' Law of the Lever . . . don't you?)
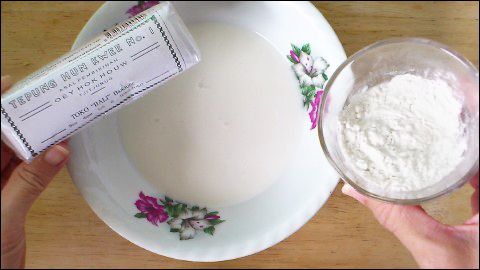
Besides coconut milk and pandan juice, there's also butter in cake kaya. The fat is absolutely necessary. It hides the floury taste of hun kwee flour.
Unlike its cousin that's spread on bread, cake kaya is made without eggs. Bread kaya is set with eggs but cake kaya is set with hun kwee flour (a starch made from mung beans) and agar-agar powder.

Hun kwee flour is available at most supermarts if you live where I live. If you're in the western/southern hemisphere, try Asia grocery stores. In the US, Amazon.com can deliver a pack to your doorstep.
Pandan kaya cake may be assembled upside down. IOW, you start with a layer of kaya and finish with a layer of cake on top. After the kaya is set, the cake is flipped right way up.
I prefer to assemble my cake right way up, starting with a layer of cake and finishing with a layer of kaya.

If you do it my way, make sure the kaya isn't too thin when you pour it on the first cake layer. If it's watery, it'll seep underneath the cake. What's the right consistency? Kind of like thick but pourable cream.
Kaya that's too thick is also problematic. If it's not thin enough to flow smoothly, the layers formed won't be even. How do you stop the kaya from becoming too thick?
1) Measure the ingredients accurately. 2) Use a pot that retains heat well. 3) Don't overcook the kaya. 4) Have your cake layers and pan (or cake ring) ready before cooking the kaya.

If you look at the written recipe below, you'll find it's rather long. That's because describing the process in detail requires a lot of words. Well, 1,000 words = 1 picture, right? If you watch the video, the recipe doesn't look too daunting. In fact, if you enjoy baking, it looks exactly like the kind of thing you'd want to do this weekend.
Repeat after me: "Baking is fun, not work! Baking is fun, not work! Baking is . . . ." (I'm sure you knew that.)
Pandan Layer Cake
Singaporean pandan kaya cake has an identical twin in Malaysia called
pandan layer cake. How to tell the twins apart? The kaya in the Malaysian cake is like agar-agar/jelly. The Singaporean version, OTOH, is like kueh.
To make pandan layer cake, use 3/4-1 tsp of agar-agar powder instead of 1/2 tsp. More agar-agar powder makes the kaya set quickly, so you must be quick when you're assembling the cake or the kaya layers won't be smooth.
PANDAN KAYA CAKE (班兰咖吔蛋糕)
(Recipe for one 20 x 12 cm cake)
Cake
  10 g castor sugar 10 g castor sugar
45 g egg yolks
50 g corn oil
45 g full-fat milk
8 drops pandan paste, less if your egg yolks aren't as yellow as mine
50 g cake flour
1/4 tsp baking powder
1/16 tsp salt
 105 g egg whites 105 g egg whites
1/8 tsp cream of tartar
40 g castor sugar
Kaya
300 g water
1/2 tsp white agar-agar powder
40 g sugar
25 g unsalted butter
40 g pandan juice
rinse 50 g young pandan leaves; cut 5-6 cm long; grind in food processor with 30 g water till fine; press with potato ricer, in 2 batches, to yield 40 g pandan juice; if you have less/more, increase/decrease the 300 g water  1/8 tsp salt 1/8 tsp salt
120 g pure coconut milk, freshly squeezed
35 g white hun kwee flour
5 drops pandan paste
1 big drop egg yellow food colour
1. To make cake, trim 5 mm thick corrugated cardboard to fit sides of 23 x 15 cm cake pan. Wrap each piece of cardboard in aluminium foil, shining side facing out. Line bottom of 20 x 12 x 7.5 cm cake pan with 2 layers of parchment paper.
2. Preheat oven to 160°C. Measure ingredients for cake as detailed above.
3. Whisk 10 g castor sugar with egg yolks till dissolved. Add corn oil. Whisk till just combined. Add milk. Whisk till just thoroughly mixed. Add pandan paste, 6-8 drops, to make yolk mixture's colour look like Golden Delicious apples'. Mix thoroughly. Sift cake flour and baking powder into mixture. Add salt. Whisk till just thoroughly mixed.
 4. Separately whisk egg whites till frothy. Add cream of tartar. Whisk till thick foam forms. Gradually add 40 g castor sugar whilst still whisking. Continue to whisk till firm peak stage. 4. Separately whisk egg whites till frothy. Add cream of tartar. Whisk till thick foam forms. Gradually add 40 g castor sugar whilst still whisking. Continue to whisk till firm peak stage.
5. Thoroughly whisk yolk mixture. Add egg whites in 3 batches. Mix with whisk till almost even after each addition. Scrape down and fold with spatula till just evenly mixed, banging mixing bowl against worktop 2-3 times.
6. Pour batter into 20 x 12 x 7.5 cm cake pan, slowly and from about 30 cm high. Jiggle pan till batter is level, tapping pan against worktop 2-3 times.
7. Place cake pan holding batter in 23 x 15 cm cake pan. Tuck cardboard between 2 pans. Bake in bottom of oven till middle of cake doesn't squish when pressed gently, 40-45 minutes.
 8. Remove pans from oven. Remove cardboard and outer pan. Drop pan holding cake from about 30 cm high, once. Invert pan onto wire rack. Leave till just cool. Unmould cake and remove parchment paper. 8. Remove pans from oven. Remove cardboard and outer pan. Drop pan holding cake from about 30 cm high, once. Invert pan onto wire rack. Leave till just cool. Unmould cake and remove parchment paper.
9 Slice cake horizontally with serrated knife into 3 layers.
10. Wash and dry cake pan. Line pan with aluminium foil with some overhang.
11. To make kaya, place water in a small pot that retains heat well. Sprinkle agar-agar powder into water. Add sugar, unsalted butter, pandan juice and salt. Set aside for 30 minutes or longer.
12. Place coconut milk in a bowl. Add hun kwee flour. Stir thoroughly. Refrigerate till ready to use.
13.  After cutting cake and prepping cake pan as detailed above, heat and stir agar-agar mixture till agar-agar powder dissolves. (Mixture is now very hot but not boiling.) Turn off heat. Add coconut milk mixture. Stir thoroughly. Add 5 drops pandan paste and 1 big drop egg yellow food colour. Stir thoroughly. After cutting cake and prepping cake pan as detailed above, heat and stir agar-agar mixture till agar-agar powder dissolves. (Mixture is now very hot but not boiling.) Turn off heat. Add coconut milk mixture. Stir thoroughly. Add 5 drops pandan paste and 1 big drop egg yellow food colour. Stir thoroughly.
14. Turn on heat to medium-low. Cook and stir agar-agar mixture till thick enough to coat sides of pot thinly. Turn off heat. Stir till residual heat dissipates. (Mixture should now be thick enough to coat sides of pot thickly but thin enough to flow smoothly.)
15. To assemble cake, place what was top part of cake in cake pan, cut side up. Pour 140 g kaya into pan. Tilt pan from side to side and swirl kaya to form even layer. Wait till kaya layer thickens slightly, about 60 seconds (less if it's cold where you are). Place what was middle part of cake on kaya layer. Make kaya layer  as before. Wait 30 seconds or so. Top with what was bottom part of cake, cut side up. Make kaya layer as before. as before. Wait 30 seconds or so. Top with what was bottom part of cake, cut side up. Make kaya layer as before.
16. Leave assembled cake on wire rack to cool down. Refrigerate, covered, till ready to serve and kaya is firm.
17. To serve, unmould cake and trim 1 cm from all edges. Transfer to serving plate. Leave till cake is at room temperature, covered. Cut and serve. |


 Most recipes for banana cake have about 1 part banana to 1 part flour. Some may go up to 2:1. Mine has 175 g bananas to 70 g flour, so the ratio is 2.5:1.
 By making the cake rise, so it's not dense. And making the cake dry out, so it's not too wet.
  still be wet when the top is brown. Mashed bananas dry out slowly, so the cake must be baked longer, at a lowish temperature. If the cake is too wet when it's removed from the oven, it'll shrink as it cools down or after it's unmoulded.
 A fluffy cake is fluffy because its structure is weak. To stop the structure from collapsing when it's at its weakest – just after the cake is removed from the oven – it must cling to the sides and bottom of the cake pan. The pan, therefore, mustn't be non-stick and it must be inverted once it's removed from the oven. A funnel in the middle gives the cake more surface area to cling to.
  Banana cake is best served without frosting, so there's nothing to mask the flavour of the bananas.
 70 g cake flour
 incorporated. Sift cake flour, baking soda and baking powder into mixture. Add salt. Mix with whisk till just even.
  rotating pan as you pour so that batter is spread evenly. Jiggle pan till batter is level. Bake in bottom of oven for about 1 hour, till cake is well browned and, when pressed lightly, springs back and squishes softly. (Loud squishing means the cake is still too wet.) Remove cake from oven. Invert onto something narrow and tall, e.g. jam jar or inverted glass. Leave till cool. Cut cake out of pan. Serve.
 Chomp, chomp,
  Besides treating insomnia, charcoal powder is a good antidote. It inactivates poisons by binding with the toxins.
 OK, I just totally made that up. If you were poisoned, you'd need loads of charcoal powder, loads more than there would be in a cake or two.
 definitely charcoal of some sort around her eyes, on her brows, and as a teeth whitener.
 45 g egg yolks
 Trim 5 mm thick corrugated cardboard to fit sides of 23 x 15 cm cake pan. Wrap each piece of cardboard in aluminium foil, shining side facing out.
  Separately whisk egg whites till frothy. Add cream of tartar. Whisk till thick foam forms. Gradually add 35 g castor sugar whilst still whisking. Continue to whisk till firm peak stage.
 batter is level. Place in bigger cake pan. Tuck cardboard between 2 pans. Bake in bottom of oven till cake doesn't make squishing sound when gently pressed around the middle, 50-55 minutes.
 absorber. It should be used as soon and as quickly as possible. And it should be refrigerated, even when it's still sealed.
  with green tea powder would be less fluffy and more oily than one made without.
 The flavour of green tea powder is very delicate. If there's baking soda/powder in the recipe, the delicate flavour would be compromised. Hence, green tea cake should be made without any baking soda/powder.

 40 g cake flour
  combined. Add green tea. Whisk will just thoroughly mixed. Sift cake flour into mixture. Whisk till just thoroughly mixed but small lumps are still visible.
  down and fold with spatula till just evenly mixed, banging mixing bowl against worktop 2-3 times.
 about 30 cm high, 2-3 times. Invert pan onto wire rack. Leave till just cool.
 Set aside bottom half of cake. Invert top half so that cut side faces up. Spread with half of whipped cream. Top with remaining half of cake, cut side down. Spread with remaining whipped cream. Smooth top. Trim about 1 cm from 4 edges.
 bake these little cakes, please follow the recipe. If you don't, the texture may be coarse and rubbery instead of soft and fluffy.
  eggs from the acid in the orange peel. If you add the zest before or with the flour, the batter will become thin and bubbly. The bubbles won't magically disappear in the oven, so your cakes will be full of big holes.
  There're many roads to Rome. If you compare my recipe to
 100 g eggs
 Whisk glucose, eggs and sugar till ribbon stage.
  Quickly fill cardboard moulds with batter to 90% full. Arrange moulds on baking tray, spaced apart.
 Remove cakes to wire rack.
 This rather long post, for cake newbies, can be summarised in three words: Follow the recipe. Experienced bakers may change anything they like because they know what works or probably works. Beginners, OTOH, can't tell if a seemingly insignificant detail is actually a critical part of the recipe. If you're one of these, I hope this post shows you why you may want to do everything the recipe says, and not do everything the recipe doesn't say.